Bioinformatics tools
Before we list the bioinformatics tools required to analyse genomic data, we will first need to understand various software management applications that we would need to run these tools.
Software management applications
Software management applications are indispensable tools in bioinformatics because they simplify software management, enhance reproducibility, support collaboration, and provide the flexibility needed to tackle the complex and dynamic nature of biological data analysis. These tools contribute to the efficiency and rigor of bioinformatics research and analysis workflows. Here, we will provide an overview of two software management applications, i.e., Docker and Conda.
a. Docker
Overview
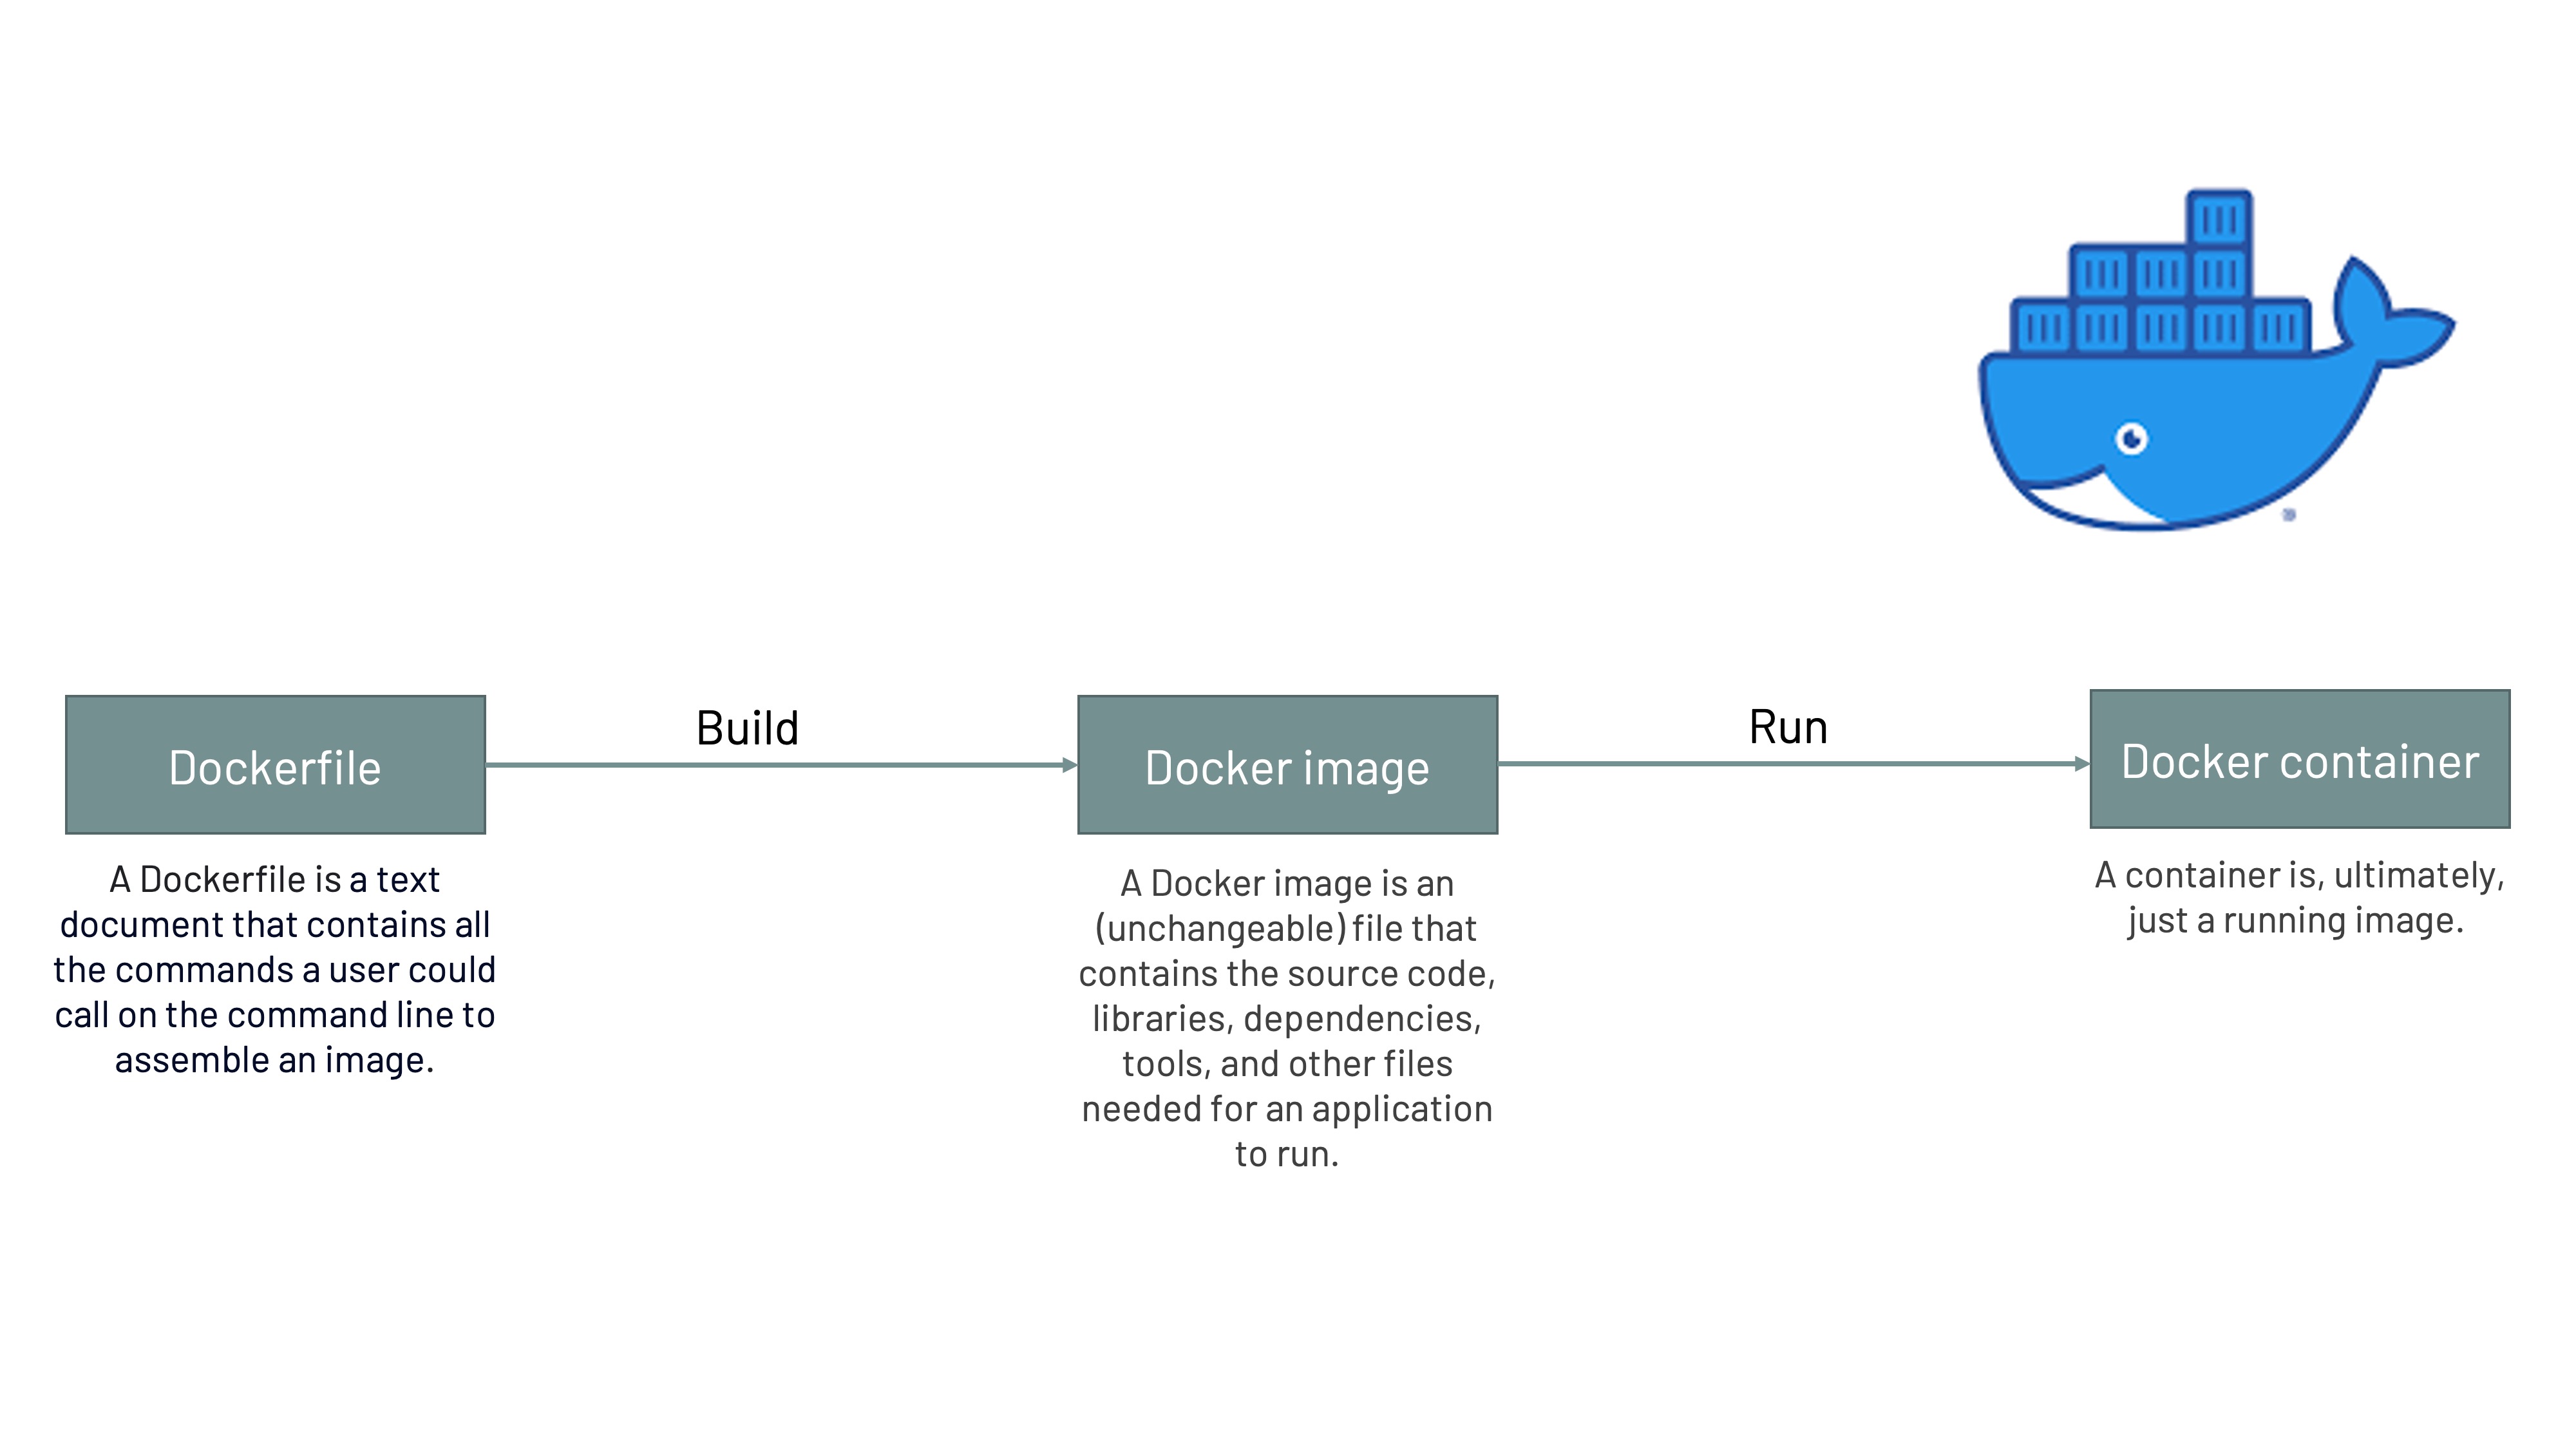
Docker is an open platform for developing, shipping, and running applications. It provides the ability to package and run an application in a loosely isolated environment called a container. Containers are lightweight and contain everything needed to run the application, so you do not need to rely on what is currently installed on the host; i.e., it involves bundling an application together with all of the necessary configuration files, libraries, and dependencies to ensure the software can run in a reproducible fashion across a diversity of computing environments. You can easily share containers while you work, and be sure that everyone you share with gets the same container that works in the same way.
Docker architecture
Installing and running docker is dependent on the computer’s operating system. We will define some key concepts that you will come across when installing and running docker.

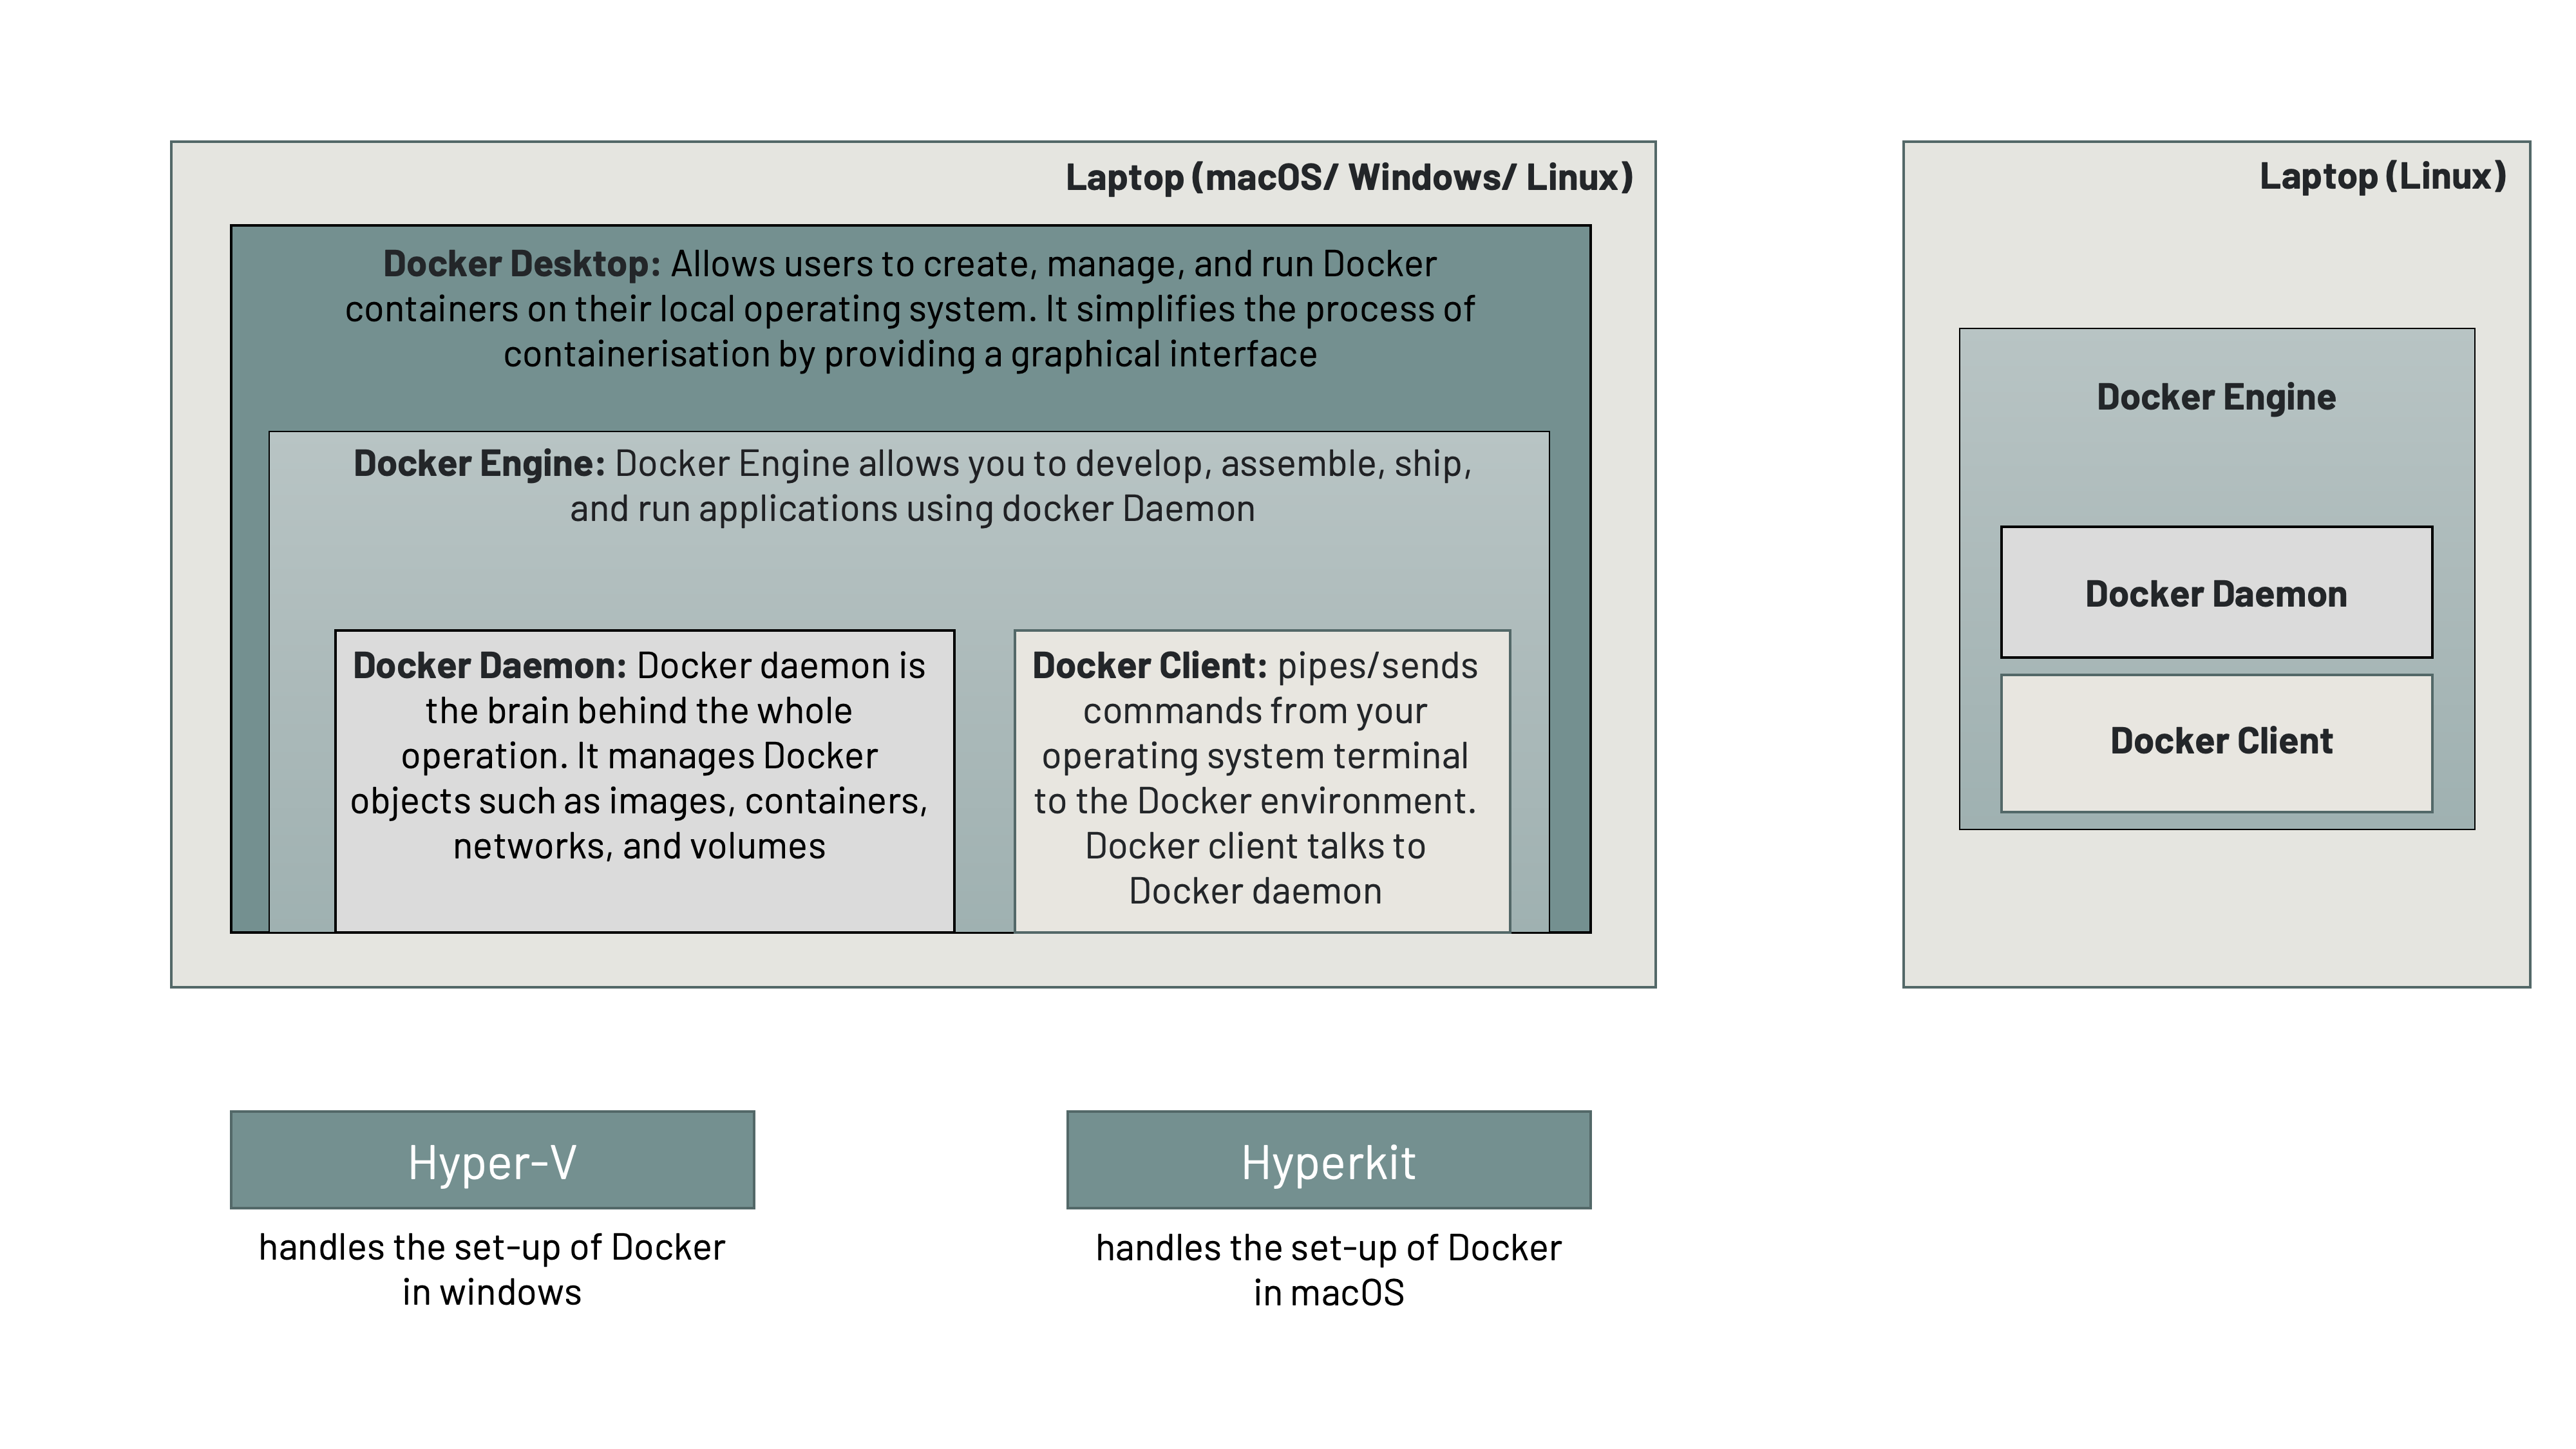
- Docker Desktop: Docker Desktop is a user-friendly application for desktop and laptop computers that allows developers to create, manage, and run Docker containers on their local operating system. It simplifies the process of containerisation by providing a graphical interface and tools to build, test, and deploy applications within lightweight, isolated containers. Docker Desktop is commonly used for software development, testing, and application deployment, making it easier to work with containerised environments on personal computers.
- Docker Engine: Docker Engine is the core component of the Docker platform. It is responsible for creating and managing Docker containers, which are lightweight, portable, and self-contained environments for running applications.
- Docker Daemon: The Docker Daemon, often simply referred to as "the daemon," is a crucial component of the Docker platform. Docker daemon is the brain behind the whole operation - it plays a central role in managing Docker containers and orchestrating containerised applications.
- Docker Client: The Docker Client, often referred to as just "Docker," is a command-line tool or graphical user interface (GUI) that allows users to interact with the Docker Daemon and manage Docker containers, images, networks, volumes, and other Docker-related resources. It pipes/sends commands from your operating system terminal to the Docker environment. Docker client talks to Docker daemon.
To install Docker on your system, you have two primary options: Docker Engine and Docker Desktop.
- If you prefer a lightweight Docker installation without additional graphical interfaces, Docker Engine is the choice to go with. Docker Engine can be installed on various Linux distributions.
- Docker Desktop is a more user-friendly option that includes Docker Engine along with additional features and a graphical user interface. It's available for both Windows and macOS.
Note
HyperKit is a lightweight hypervisor designed for macOS operating systems. It is an open-source virtualisation tool that provides virtualisation capabilities on macOS, making it possible to run virtual machines (VMs) and containers on Mac computers. HyperKit is often associated with Docker for Mac, as it is one of the components used by Docker to enable containerisation and virtualisation on macOS.
Hyper-V is a virtualisation platform and hypervisor technology developed by Microsoft. It allows you to create and manage virtual machines (VMs) on Windows-based systems. Hyper-V is commonly used for server virtualisation, testing and development environments, and running multiple operating systems on a single physical machine.

How to install Docker
a. Steps to install Docker on macOS:
1. Download Docker Desktop:
- Go to the Docker Desktop for Mac page on the Docker website.
- Click the "Download from Docker Hub" button to download the Docker Desktop installer.
2. Install Docker Desktop:
- Open the downloaded .dmg file to mount the Docker Desktop disk image.
- Drag the Docker icon to the Applications folder.
3. Run Docker Desktop:
- Open Docker Desktop from your Applications folder.
4. Login to Docker Hub (Optional):
- If you have a Docker Hub account, you can log in to Docker Desktop. This step is optional but allows you to access and download images from Docker Hub.
5. Configure Resources (Optional):
- In the Docker Desktop preferences, you can configure resources such as CPU, memory, and disk space allocated to Docker containers. Adjust these settings based on your system resources.
6. Start Docker Desktop:
- Click the Docker Desktop icon in your Applications folder to start Docker. The Docker icon in the menu bar indicates that Docker is running.
7. Verify Installation:
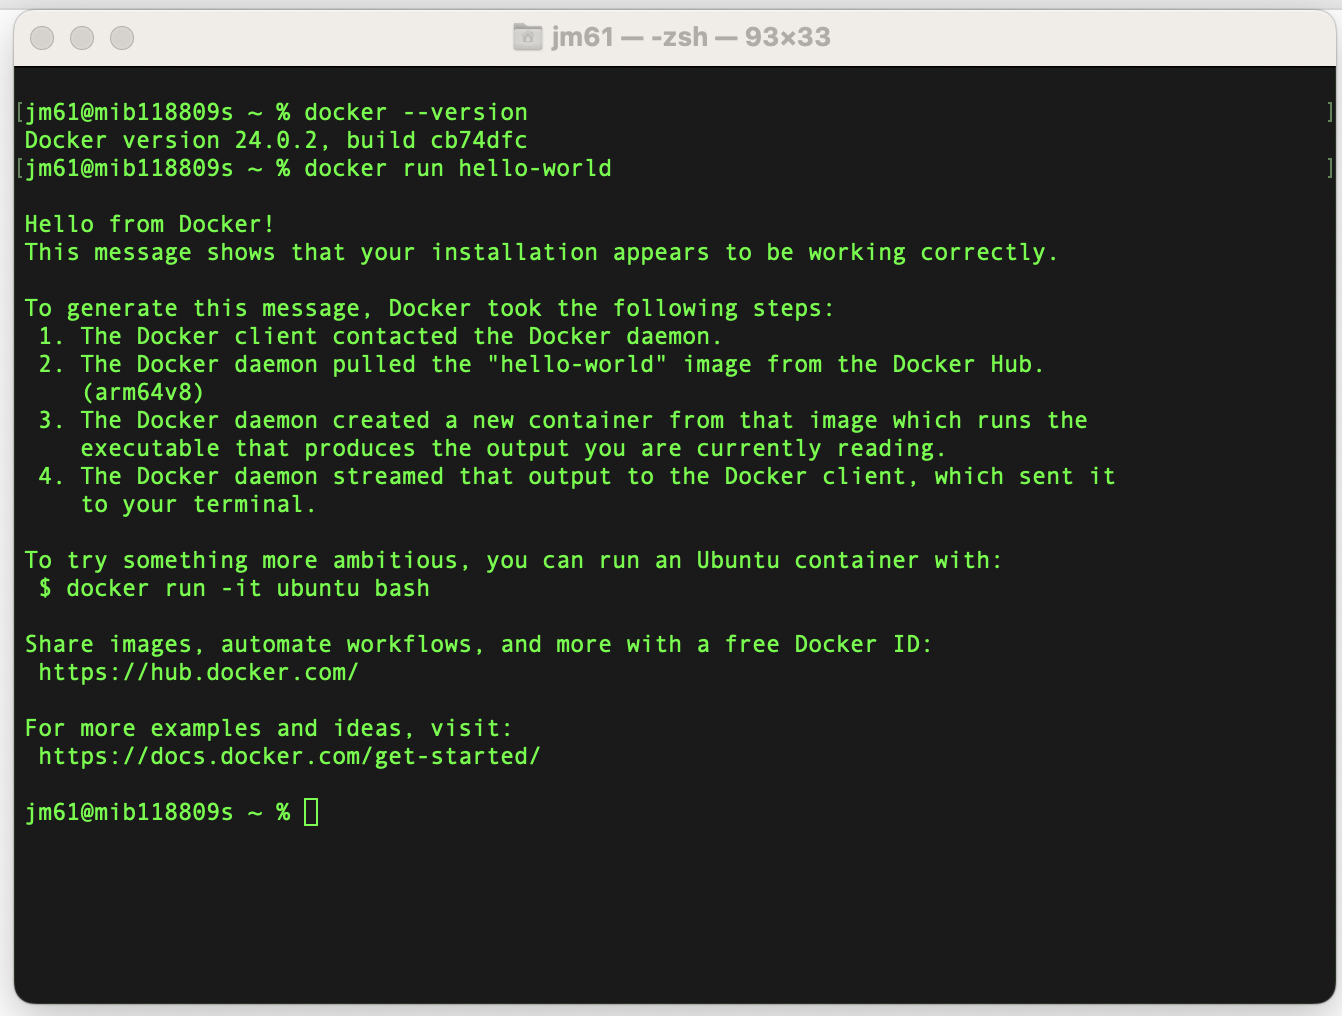
- To verify that Docker is installed and running, open a terminal and run the following commands:
- The first command should display the Docker version, and the second command runs a simple container to verify that Docker can pull and run images.
docker
--version
docker run
hello-world

b. Steps to install Docker on ubuntu:
Run the following commands on you ubuntu terminal
1. Update Package Lists:
sudo apt
update
2. Install Prerequisites:
sudo apt install
apt-transport-https ca-certificates curl software-properties-common
3. Add Docker's GPG Key:
curl -fsSL
https://download.docker.com/linux/ubuntu/gpg | sudo gpg --dearmor -o
/usr/share/keyrings/docker-archive-keyring.gpg
4. Set Up the Stable Docker Repository:
For Ubuntu 20.04 (Focal Fossa):
echo "deb [arch=amd64
signed-by=/usr/share/keyrings/docker-archive-keyring.gpg]
https://download.docker.com/linux/ubuntu focal stable" | sudo tee
/etc/apt/sources.list.d/docker.list > /dev/null
5. Install Docker Engine:
sudo apt
update
sudo apt install docker-ce
docker-ce-cli containerd.io
6. Start and Enable Docker:
sudo systemctl start
docker
sudo systemctl enable
docker
7. Verify Docker Installation:
docker
--version
8. Run a Test Container:
docker run
hello-world
If everything is set up correctly, you should see a message indicating that your Docker installation is working.
9. Manage Docker as a Non-root User (Optional):
To avoid using sudo with every Docker command, add your user to the docker group:
sudo usermod -aG docker
$USER
Log out and log back in or restart your system for the changes to take effect.
Docker Usage
In this course, we will be using Docker as a our software management application and Docker images (bioinformatics tools) built and catalogued by Sanger Pathogens, the State Public health Bioinformatics (StaPH-B) and NCBI.
Step 1: Downloading a Docker image
Download an image from a repository
by using the docker pull command:
docker pull
repository/(name_of_container):(tag)
For example
docker pull
staphb/snippy
An explanation of this command is as follows:
docker pull: instructs Docker to download an image from a repository
staphb/snippy: is the docker image
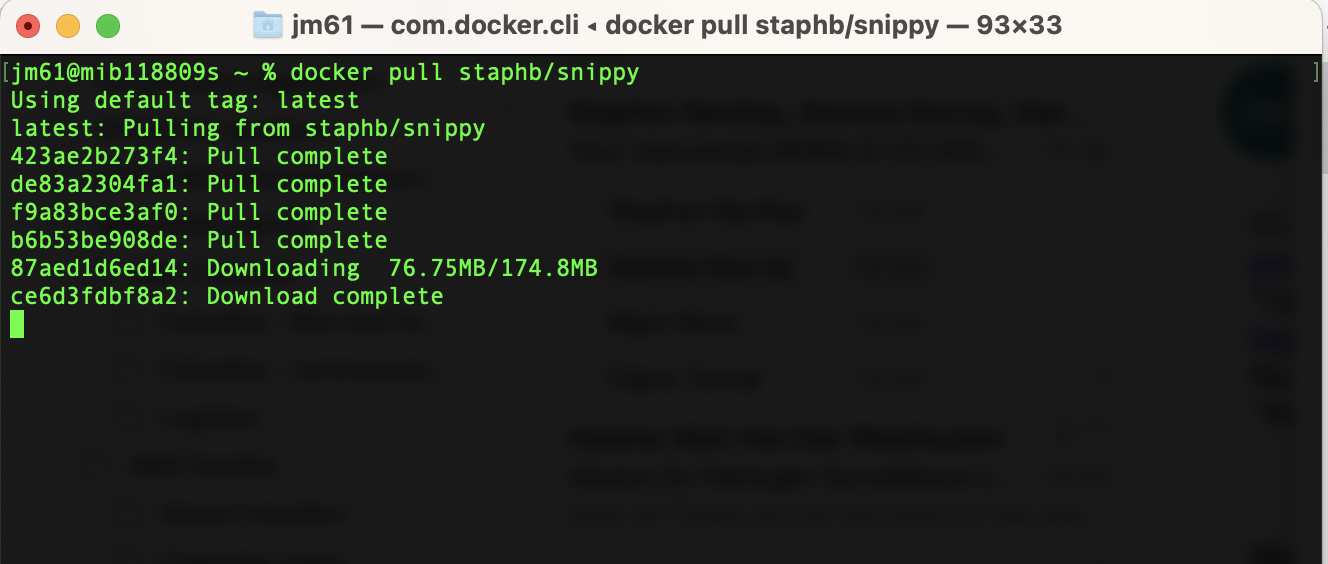
When you pull a docker image, you should see an output similar to this…

Step 2: Running a Docker image
Starting a container from a docker
image is simply done using the command docker run. A brand new
Docker container is then created, and will run any command you provide within the
container.
For example
docker run --rm=True -v
$PWD:/data
-u $(id -u):$(id -g) staphb/fastqc fastqc 21999_7#176*.fastq.gz
An explanation of this command is as follows:
docker run: function to start a new container
--rm=True: By default, when a Docker container is run without this flag, the Docker container is created,the container runs, and then exits, but is not deleted. In other words, Docker containers are NOT ephemeral by default. A local copy of the container is kept and takes up unnecessary storage space. It is a good idea to always use this flag so that the container is removed after running it, unless for some reason you need the container after the specified program has been run.
-v $PWD:/data: The -v flag mounts a volume between your local machine and the Docker container. This specific command mounts the present working directory to the /data directory within the Docker container, which makes the files on your local machine accessible to the container. You can change these paths to meet the needs of your system, however it is a good idea to have a working directory in each of the containers, and thus each container contains the /data directory for such purpose.
--u $(id -u):$(id -g): By default, when Docker containers are run, they are run as the root user. This can be problematic because any files created from within the container will have root permissions/ownership and the local user will not be able to do much with them. The -u flag sets the container's user and group based on the user and group from the local machine, resulting in the correct file ownership.
staphb/fastqc: is the docker image. [ staphb - is the repository; fastqc - is the name of the container image]
fastqc : Command to run in that container
21999_7#176*.fastq.gz: Option(s) of the command (paths in options are based on container file system).
To avoid long commands, the [docker run --rm=True -v $PWD:/data -u $(id -u):$(id -g)] command can be incorporated into a bash function by including the following into your ~/.bashrc (if you are using Bash shell / Linux) or ~/.zshrc (if you are using Z shell / macOS)
# For Bash Shell, run the command:
echo 'function
docker_run() { docker run --rm=True -u $(id -u):$(id -g) -v $(pwd):/data "$@" ;}' >>
~/.bash_profile
# For Z Shell, run the command:
echo 'function
docker_run() { docker run --rm=True -u $(id -u):$(id -g) -v $(pwd):/data "$@" ;}' >>
~/.zshrc
You need to be in your home directory and then run the one of the following commands depending on your shell
You need to restart the Terminal for this change to take effect or Source the Bashrc by running the command:
source ~/.bash_profile
To check the above command has
worked properly open bashrc file using:
cat .bash_profile or cat .zshrc
Docker images/Bioinformatics tools
We will use various bioinformatics tools in this course, and the table below shows a list of tools required for this course. These tools can be accessed and executed using Docker platform.
| Tool | Website | Brief Description | Installation |
|---|---|---|---|
| FastQC | https://github.com/s-andrews/FastQC | Quality assessment for high throughput sequencing datasets | docker pull staphb/fastqc |
| Trimmomatic | https://github.com/usadellab/Trimmomatic | Adapter trimming | docker pull staphb/trimmomatic |
| bwa | https://github.com/lh3/bwa | Mapping DNA sequences | docker pull staphb/bwa |
| samtools | https://github.com/samtools/ | Manipulating NGS | docker pull staphb/samtools |
| SPAdes | https://github.com/ablab/spades/releases | De novo assembly | docker pull staphb/spades |
| snp-sites | https://github.com/sanger-pathogens/snp-sites | Rapidly extract SNPs from a multi-FASTA alignment | docker pull staphb/snp-sites |
| QUAST | https://github.com/ablab/quast | Quality assessment for genome assemblies | docker pull staphb/quast |
| BLAST | https://github.com/ncbi/blast_plus_docs | Compares nucleotide or protein sequences to sequence databases and calculates the statistical significance of matches | docker pull ncbi/blast |
| Kraken2 | https://github.com/DerrickWood/kraken2 | Kraken is an ultrafast and highly accurate program for assigning taxonomic labels to metagenomic DNA sequences | docker pull staphb/kraken2 |
| snippy | https://github.com/tseemann/snippy | Rapid haploid variant calling and core genome alignment | docker pull staphb/snippy |
| FastTree | http://www.microbesonline.org/fasttree/ | Phylogenetic tree builder | docker pull staphb/fasttree |
| Gubbins | https://github.com/nickjcroucher/gubbins | Builds phylogeny after removing regions of recombination | docker pull sangerpathogens/gubbins |
| popPUNK | https://github.com/bacpop/PopPUNK | Clustering | docker pull staphb/poppunk |
| Abricate | https://github.com/tseemann/abricate | Mass screening of contigs for antimicrobial resistance or virulence genes | docker pull staphb/abricate |
| Prokka | https://github.com/tseemann/prokka | Prokka is a software tool to annotate bacterial, archaeal and viral genomes quickly and produce standards-compliant output files | docker pull staphb/prokka |
| Any2fasta | https://github.com/tseemann/any2fasta | Convert various sequence formats to FASTA | docker pull staphb/any2fasta |
| ARIBA | https://github.com/sanger-pathogens/ariba | Antimicrobial Resistance Identification By Assembly | docker pull staphb/ariba |
| SeroBA | https://github.com/sanger-pathogens/seroba | Identify the Serotype from Illumina NGS reads for given references | docker pull staphb/seroba |
| SRST2 | https://github.com/katholt/srst2 | Gene detection and MLST | docker pull staphb/srst2 |
| mlst | https://github.com/tseemann/mlst | Scan contig files against traditional PubMLST typing schemes | docker pull staphb/mlst |
To check that Docker images have been downloaded, run the command:
docker images | grep
"staphb\|sanger\|ncbi"| wc -l
There should be 20
b. Conda
Definitions
Anaconda: is a distribution of Python and R programming languages for scientific computing, data science, machine learning, and related domains. It includes a variety of pre-installed libraries and tools commonly used in these fields. Anaconda simplifies the process of managing packages and environments for data science projects. Simply, Anaconda is a comprehensive distribution that includes a variety of pre-installed packages for data science and scientific computing.
Miniconda: is a minimal installer for the Conda package manager. Unlike Anaconda, which comes with a pre-selected set of packages, Miniconda allows users to install only the packages they need, making it a lightweight alternative. Simply, Miniconda is a minimal installer for Conda, allowing users to install only the packages they need for a more lightweight setup.
Conda: is the package manager used by both Anaconda and Miniconda. It is an open-source package management and environment management system that runs on Windows, macOS, and Linux. Simply, Conda is the package manager that can be used independently of Anaconda or Miniconda. It simplifies the process of managing packages and environments.
Conda environment: A Conda environment is a self-contained directory that contains a specific collection of Python (or other programming language) packages and their dependencies. Environments allow you to manage and isolate different sets of packages, ensuring that your projects have the specific dependencies they need without interfering with each other.
i. Steps to install Anaconda:
1. Download:
- Visit the Anaconda download page and choose the appropriate version (Python 3.x is recommended).
2. Install:
- Follow the installation instructions for your operating system. The installation typically involves running an installer and accepting the license terms.
3. Verify Installation:
- After installation, you can open a terminal or command prompt and run:
- This command should display the installed version of conda.
conda
--version
4. Create and Activate an Environment (Optional):
- You can create a new environment using:
- Activate the environment:
conda create --name
myenv
conda activate
myenv
ii. Steps to install Miniconda:
1. Download and Install:
- Visit the Miniconda website page and then follow the installation instructions.
2. Create and Activate an Environment (Optional):
- You can create a new environment using:
- Activate the environment:
conda create --name
myenv
conda activate
myenv
3. Install Packages:
- Once the environment is activated, you can use conda to install packages. For example:
conda install
numpy
3. Deactivate the Environment:
- When you're done working in the environment, you can deactivate it:
conda
deactivate
4. Remove an Environment (Optional):
- If you want to remove an environment, you can use:
conda env remove --name
myenv
N/B:Miniconda is a great choice for users who prefer a more minimalistic and customizable setup. It allows you to build environments tailored to specific projects or use cases without the overhead of a larger distribution like Anaconda.